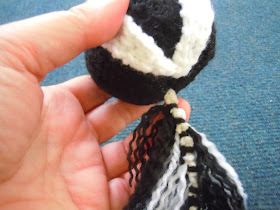
Cut your yarn into about 40 5-inch pieces -- 20 black and 20 white.
Then tie them, one at a time, onto the pipe stem cleaner. You'll need to start about 3 inches from the bottom.
Keep going for about 6 inches, more or less. You may want to use all white for the last inch or two. Here's what it looks like with about half of the yarn tied on. I went back and thickened it up after I took this picture.
Then grab a dpn (or anything else with a point), and begin separating the pieces of yarn into individual strands.
This is what it looks like when you're done.
Trim off the excess pipe stem cleaner at the top (white end), and stick the bottom end of the pipe stem cleaner into the skunk's, er, you know.
Fold the tail upwards toward the body, and sew about an inch of it to the back of the skunk.
And there you have it!


So cute, thank you!
ReplyDeleteYou're welcome! It's my pleasure. :-)
DeleteYour pattern for the skunk confused me and I have been knitting since I was 7. I really think you need to label this an intermediate pattern on ravelry. It would alsi be nice if you had included pictures. As your pattern says at the neck but no where do you specify you are working the body of the skunk.
ReplyDeleteI love this pattern! I can't wait to make it. When I was little my family had a pet skunk. It was descented. I have photos of my father holding me with one arm and the pet skunk in the other. Thanks for sharing this pattern.
ReplyDelete